
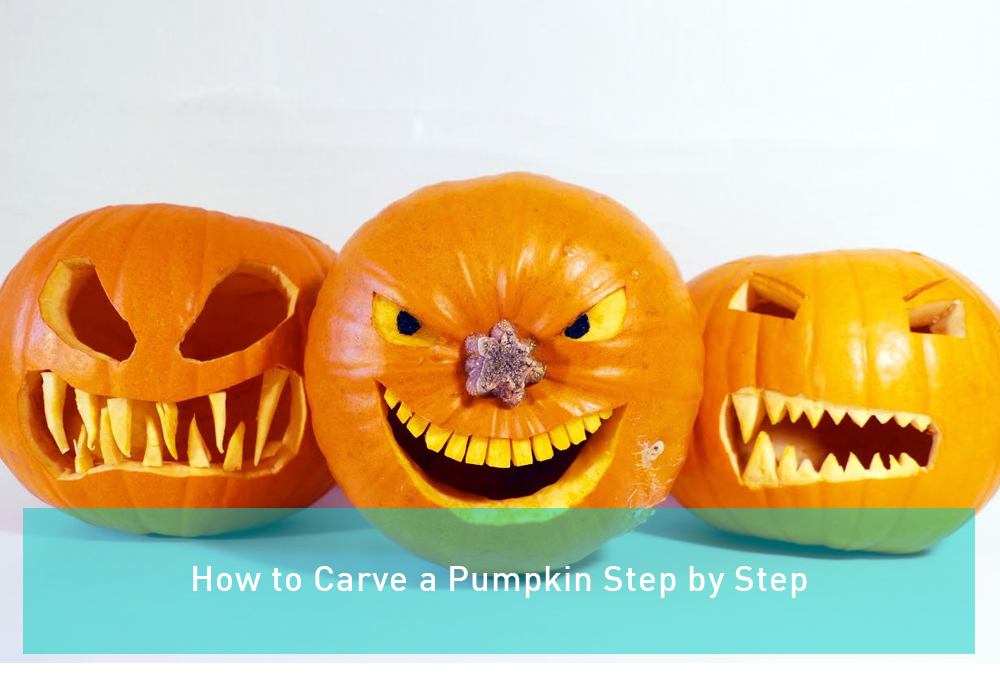
The most effective method to Carve a Pumpkin Step by Step
Before the pumpkin flavor latte (and pumpkin zest everything else) furor cleared the country, fall was plain ol’ pumpkin season: pumpkin pie, pumpkin soup, and, obviously, pumpkins cut into jack-o’- lamps. As a Halloween convention, it very well may be amusing to figure out how to cut a pumpkin and make your own jack-o’lantern.
“Pumpkin” is a term utilized for certain winter squashes, regularly orange ones with ribs, in any case, as of late, numerous different hues (counting white, tan, red and dim green) and states of pumpkins have gotten progressively normal. All pumpkins are winter squashes. Be that as it may, just some winter squashes are pumpkins. Winter squashes all have a thick layer of consumable substance inside an extreme skin and a focal cavity approximately loaded up with stringy fragile living creature and palatable seeds. All pumpkins, even the modest, fancy ones are eatable. In any case, pick natural pumpkins in the event that you intend to eat them, as traditional producers will in general splash the harvest every now and again.
Pumpkins are not gourds, despite the fact that pumpkins and gourds are both utilized for fall improving. They are incidentally (and mistakenly) named as gourds and the other way around. So how might you tell a gourd from a pumpkin? Cut it open: Pumpkins have firm, yet sodden, tissue inside their hard skin. Ready gourds normally have a thick, woody shell and any tissue that remaining parts will be dry and sinewy (loofah wipes are a case of gourd strands).
Peruse on to study how to cut a pumpkin and why we cut them in any case.
Why Are Pumpkins Carved at Halloween?
Before you figure out how to cut a pumpkin, you likely could be asking why we do it in any case. The convention of cutting pumpkins into frightening appearances has its underlying foundations in Ireland. Turnips, beets and even potatoes were dug out, cut, and lit up to drive fiendish spirits off on All-Hallows’- Eve, the night prior to All-Hallows Day (All-Saints’ Day). It is very likely that cut and lit up veggies were a piece of Celtic fall celebrations some time before St. Patrick ventured onto the Emerald Isle. The expression “jack-o’- light” alludes to the creepy glimmering of the light fire inside. The candlelight helped individuals to remember the glinting lights that show up and vanish over marshes and lowlands, alluded to as “will-o’- the-wisps” or “jack-o’- lamps.”
At the point when Irish migrants went to the U.S. they carried their conventions with them. They quickly received the pumpkin as the vegetable of decision. It appeared well and good for them to make sense of how to cut a pumpkin as it was bigger and as of now empty. This made it a lot simpler to cut than to dig out and cut even an exceptionally enormous root vegetable. The present jack-o’- lights may in any case sport frightening countenances, yet they are bound to be put out for the sake of entertainment or to invite costumed stunt or-treaters than as a push to drive insidious spirits off.
Pick a Perfect Pumpkin to Carve
Before we talk about how to cut a pumpkin, we should discuss how to choose one.
Search for a firm, strong pumpkin with no weaknesses, cuts or other harmed territories (dry callused regions are OK).
Check all surfaces and particularly around the base of the stem and on the base. Goodness, and keeping in mind that the stem may LOOK like a conveying handle, abstain from toting the pumpkin around by it as it might sever, leaving a dreadful, decay inclined slice. Rather, get your pumpkin from the sides or base with two hands.
Select a develop pumpkin. You can tell a develop pumpkin by its thick, cut safe skin (in the event that you can cut the skin with your fingernail is isn’t ready and it won’t keep going long, so search for another pumpkin).How to Carve a Pumpkin Step by Step,What is the easiest way to carve a pumpkin?,How long does it take to carve a pumpkin?,How do you carve a pumpkin without cutting it?,How do you carve a scary pumpkin step by step?,Do it yourself carve pumpkins?,Why pumpkins are used in Halloween?,What are the best tools to carve a pumpkin?,How much do you scrape out of a pumpkin?,Can I carve a pumpkin with a knife?,Is it better to carve a pumpkin from the top or bottom?,How do you preserve a carved pumpkin?,What can I do with pumpkin guts?,How do you make carved pumpkins last longer?,Can you eat carving pumpkins?,Can you carve both sides pumpkin?,Does Hairspray preserve pumpkins?,How long before Halloween should you carve pumpkins?,Do you wash a pumpkin before carving?,How do you keep a pumpkin from rotting?,How do pumpkins grow successfully?,Can dogs eat pumpkins?,How does vinegar prevent pumpkins from rotting?,How do you get all pumpkin guts out?,How do you preserve a painted pumpkin?,Do pumpkins like sun or shade?,Can you use Miracle Grow on pumpkins?,Do pumpkins keep growing after they turn orange?
Shop at a neighborhood ranch, as pumpkins sent the nation over may get wounds en route, and wounds can prompt untimely decay.
Make certain to consider the appalling, lopsided pumpkins, as you can frequently utilize their shape as a component of your plan.
At the point when you get it home, give the outside of your pumpkin a decent clean with common dish cleanser or castile cleanser to help lessen the quantity of microorganisms hanging out on the skin, simply sitting tight for you to cut into it so they can eat.
Plan on showing your pumpkin uncarved until a day or two preceding the enormous day (on the off chance that you just can hardly wait, get one to cut immediately and another to cut just before Halloween).
The most effective method to Carve a Pumpkin Step by Step
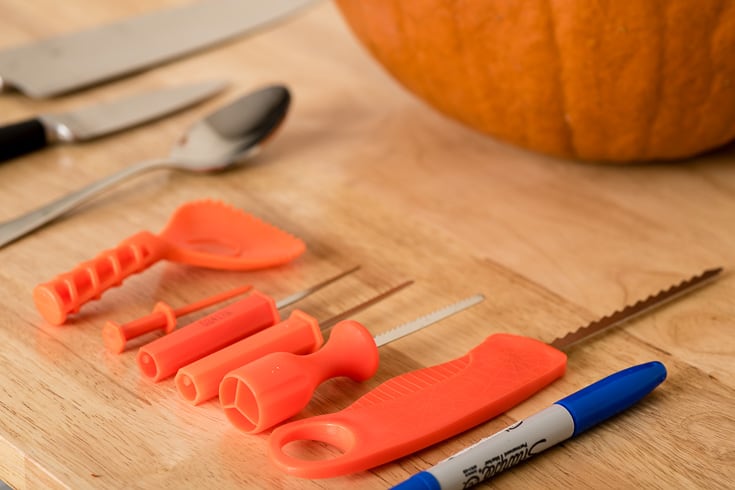
On the off chance that you are thinking about how to cut a pumpkin into a jack-o’- light, this is what you have to know: Obviously, you need a pumpkin (see above), in addition to you’ll require two or three instruments for cutting, scratching, and cutting (you most likely have some in your kitchen drawers that will serve).
Cutting/cutting instruments:
A sharp, durable, long-bladed blade and a sharp paring blade are workable cutting apparatuses for making a basic jack-o’- light. For fancier plans and simple pumpkin cutting, you might need to put resources into a couple of more secure and increasingly careful executes, for example, little saws and a borer (for making openings to begin sawing from). A saw and drawbore combo likewise makes for more secure fingers and is energetically prescribed for safe pumpkin cutting with little kids (sparing the two fingers and your nerves).
On the off chance that you have an apple-corer, that functions admirably for making round gaps or adjusting corners. Any etches or cutting apparatuses you have for working with different materials can likewise be utilized (despite the fact that they are undependable choices for kids); simply make certain to perfect and dry the devices well after use to abstain from rusting. When you get familiar with the fundamentals of how to cut a pumpkin, you might need to try different things with various devices. Experts even utilize an electric cutting device, for example, a Dremel.
Scooping and scratching apparatuses:
Your hand makes a decent scoop for extricating the greater part of the seeds and the stringy sinewy goo. In any case, to get out all the guts, you’ll likely need a scrubber other than your fingernails. A tablespoon or soup spoon (the more slender the bowl the better, as the edge will be more honed) or a melon-hotshot make functional scrubbers for getting the remainder of the stringy guts out of a pumpkin. You can likewise purchase particular scrubbers/scoops that have wide sharp edges and short handles, which are simpler to control inside a pumpkin.
Since you have your devices, here is, bit by bit, how to cut a pumpkin into a jack-o’- lamp:How to Carve a Pumpkin Step by Step,What is the easiest way to carve a pumpkin?,How long does it take to carve a pumpkin?,How do you carve a pumpkin without cutting it?,How do you carve a scary pumpkin step by step?,Do it yourself carve pumpkins?,Why pumpkins are used in Halloween?,What are the best tools to carve a pumpkin?,How much do you scrape out of a pumpkin?,Can I carve a pumpkin with a knife?,Is it better to carve a pumpkin from the top or bottom?,How do you preserve a carved pumpkin?,What can I do with pumpkin guts?,How do you make carved pumpkins last longer?,Can you eat carving pumpkins?,Can you carve both sides pumpkin?,Does Hairspray preserve pumpkins?,How long before Halloween should you carve pumpkins?,Do you wash a pumpkin before carving?,How do you keep a pumpkin from rotting?,How do pumpkins grow successfully?,Can dogs eat pumpkins?,How does vinegar prevent pumpkins from rotting?,How do you get all pumpkin guts out?,How do you preserve a painted pumpkin?,Do pumpkins like sun or shade?,Can you use Miracle Grow on pumpkins?,Do pumpkins keep growing after they turn orange?
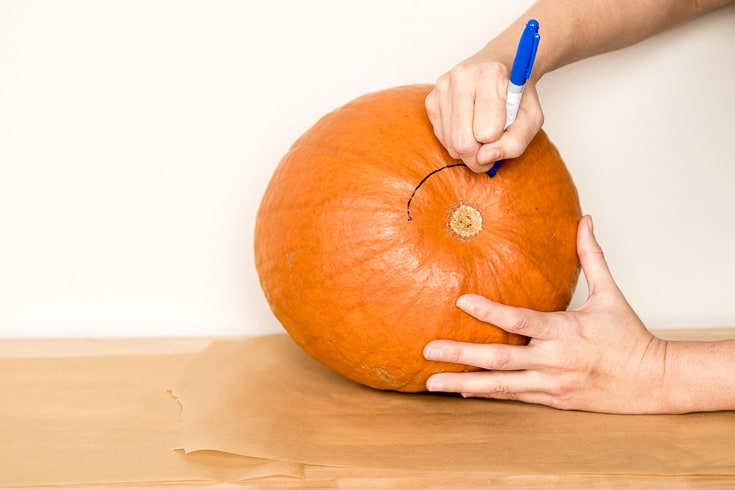
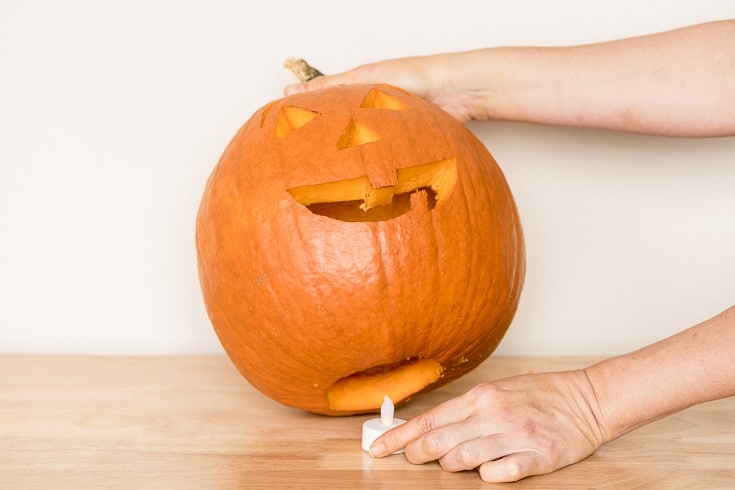
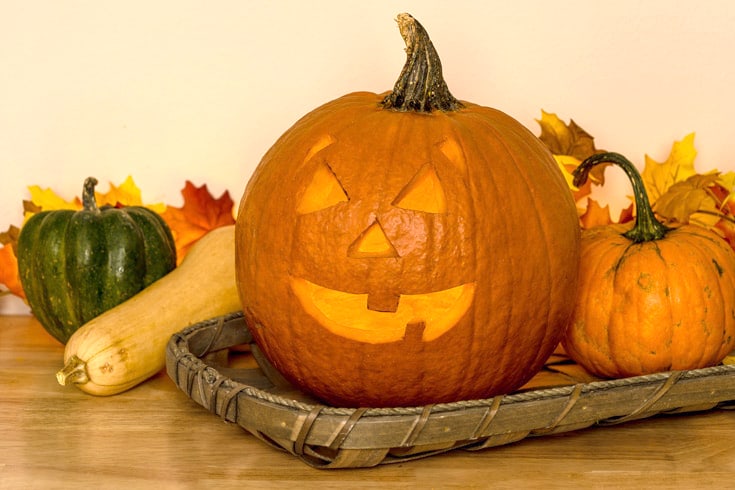
Stage 1. Cut into the pumpkin.
Spot your pumpkin on a strong surface you can wash (or spread paper to get any trickles). Draw the proposed cut on the skin with a felt tip marker: You need the gap sufficiently enormous to get your clench hand through, yet no bigger, as you need to keep however much of the pumpkin unblemished as could be expected so it will save its shape for whatever length of time that conceivable.
Most pictures you see show a cover cut out from the top and based on the stem, and that is fine. At the point when you make the cut for a top opening and stemmed top, edge the blade in toward the focal point of the contrary side of the pumpkin, as opposed to straight down, to make an edge for the cover to sit (on the off chance that you chop straight down your top will fall into the pit when you set it back on).
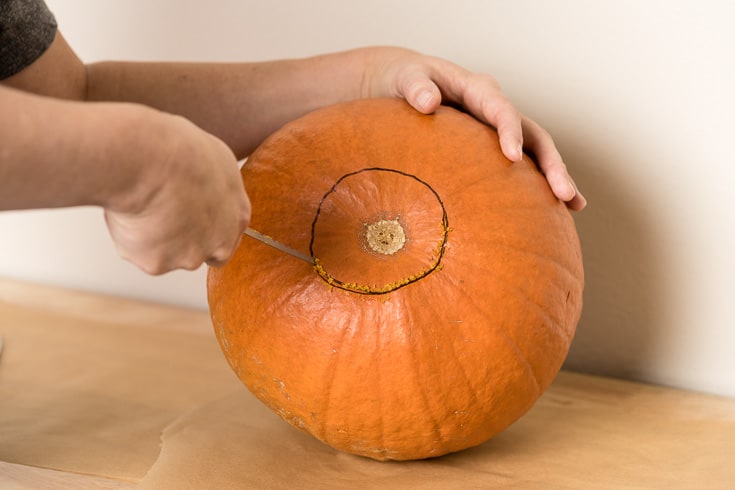
In any case, let me disclose to you how to cut a pumpkin a superior way: Make a straight-sided opening into the focal point of the base of the pumpkin. This has three focal points: you won’t have a cover to fall in as the pumpkin mollifies; sobbing fluids won’t develop in the cut pumpkin to pull in creepy crawlies and energize decay; and it will be a lot simpler to light the jack-o’- lamp with a flame (you simply light the light and afterward set the jack-o’- light down over the lit light, instead of objecting around inside your cut pumpkin with a coordinate or lighter and completion with seared fingers).
Utilize an overwhelming blade with a sharp point or a bit and pumpkin-saw to slice through the skin and fragile living creature and into the seed depression in the focal point of the pumpkin. Alert: pumpkin skin is extreme and crude pumpkin tissue is HARD! Be cautious when working with a blade, as you should push hard and it is anything but difficult to slip and cut excessively far (or yourself). When you finish the cut, lift/haul the cut part out. You may need to delicately pry it out by embeddings your solid blade (or a strong margarine blade, on the off chance that you’ve been cutting with a little observed) under one edge. Cut/scratch the stringy guts off within your top (no compelling reason to do this in the event that you cut an opening in the base) and put it in a safe spot.
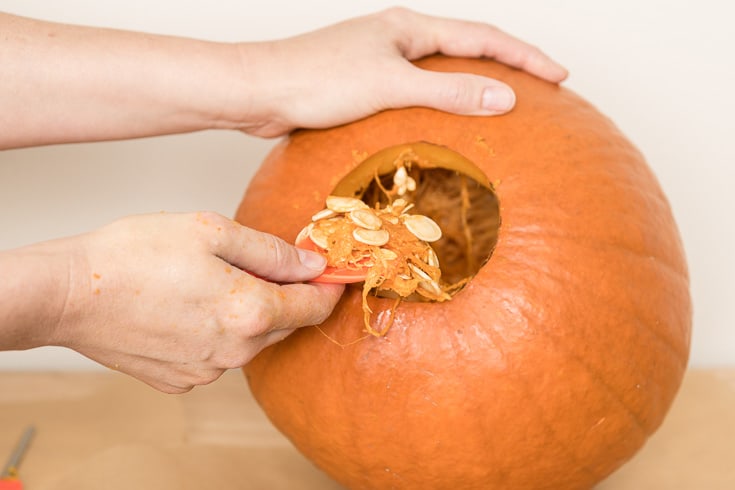
Stage 2. Pull out the guts and seeds.
Scoop out the stringy mash and seeds with your hands or a since quite a while ago dealt with spoon, setting the seeds in a single bowl (for broiling later; see beneath) and the mash in another for the chickens or the fertilizer heap. Scratch within the pumpkin to get out each piece of the stringy, delicate mash (any residual mash will speed the ruining procedure), leaving just firm, hard substance. Wipe within dry.
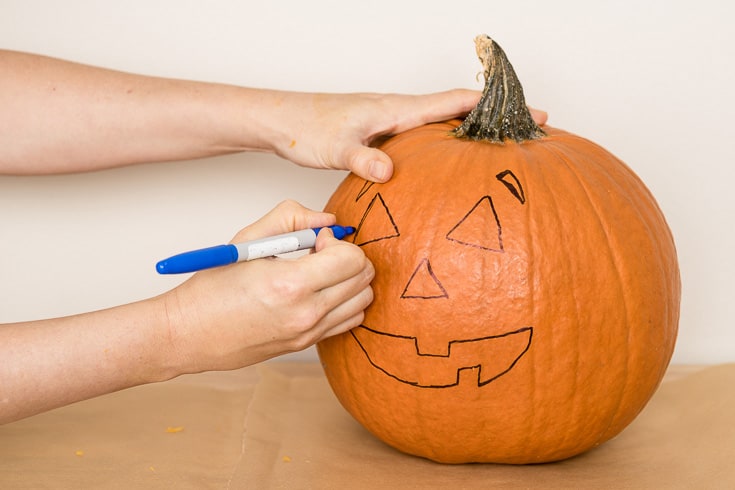
Stage 3. Draw your plan.
When you’ve made a cut you can’t delete it, so it’s a smart thought to outline your plan onto the outside of the pumpkin before getting a cutting device. A felt tip marker functions admirably for portraying and drawing. Or on the other hand, when you have the general outlining done, you can utilize a bit and jab little gaps where you intend to cut (yet you can’t eradicate these either, so you need to make certain before you do this).
As you’re figuring out how to cut a pumpkin, it might be simpler to draw straightforward shapes with straight sides, for example, triangles, particularly on the off chance that you will be removing them with a blade. Or on the other hand, you might need to utilize a pre-made example. You can be increasingly innovative on the off chance that you will be cutting with a saw. However, make sure to leave enough undisturbed substance between the individual shapes to help the pumpkin after its slice and is begins to relax or dry out.
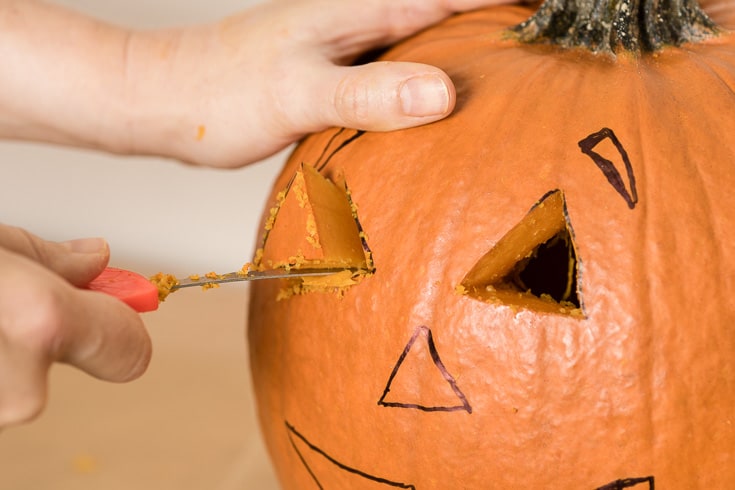
Stage 4. Cut out your structure.
Utilize a little, sharp blade or a borer and saw (this subsequent choice is a lot more secure and simpler) to cut along the edges of your stamped structure. At that point delicately press the free bits into or out of the pumpkin with your finger. For huge or convoluted openings, for example, toothy smiles, it works best to remove little areas of the shape at once. These bits of tissue can be cooked a
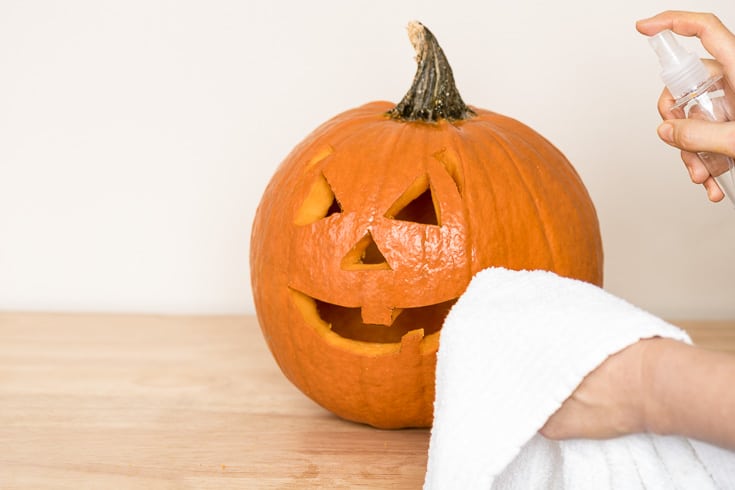
When you have wrapped up your pumpkin, splash or wipe within the depression, and all the cut surfaces, with a fundamental oil-based cleaning shower, for example, our melaleuca oil family unit cleaner or with an answer of 1 teaspoon borax disintegrated in a quart of warm water. Shockingly better: douse the cut pumpkin medium-term in a tub of borax water (1 tablespoon for each gallon).
Stage 5: Illuminate your jack-o’- lamp.
When you’ve cut a pumpkin into a jack-o’- lamp, you’ll need to show it off by getting a light inside to radiate through the plan. Tea light candles are a decent size and simple to keep upstanding. Also, on the off chance that you keep them inside a glass holder, they are less inclined to victory on a breezy night.
Utilize long chimney matches or a lighter with a long neck to help ensure your fingers and hands while lighting a flame inside a jack-o’- lamp. On the off chance that you cut your underlying opening in the base, this isn’t an issue as you simply light the flame out in the open and afterward bring down the jack-o’- lamp over it.
Make certain to approach every single lit light with deference, getting them far from anything that could burst into flames. Also, smother them when you can’t watch out for them.
You can likewise utilize a battery-worked tea light or wrap a short string of open air appraised Christmas lights around a glass container and put that inside rather than a flame (squinting ones make for an extra-creepy impact).
Make Your Jack-o’- light Last Longer
A pumpkin with a flawless skin will remain crisp and useful for a long time. In any case, when you penetrate the skin, microorganisms, for example, organisms, microscopic organisms and molds, and bugs can dive in and begin separating it (a procedure we allude to as ruining, spoiling or fertilizing the soil). Introduction to oxygen and loss of dampness into dry air likewise add to the breakdown. There are a couple of things you can do with the goal that your cut pumpkin remains sensibly firm and appealing for whatever length of time that conceivable:
In sweltering climate, putting away your jack-o’- light in the fridge when not showing it is an extraordinary method to broaden its life, in the event that you have room.
Absorb your cut pumpkin a tub of borax water (1 tablespoon for each gallon) for at any rate a couple of hours consistently. This will help hinder the spoil and shape. What’s more, it will help keep your cut pumpkin stout and lively in dry atmospheres where parchedness is an issue.
On the off chance that organic product flies become an issue, place a snare close by to weaken the populace before they lay a gazillion eggs. Make your own snare by putting an inch of remaining juice, brew or wine in a tall glass. At that point set a little channel in it (the tip should be over the degree of the fluid): flies fly in, yet make some hard memories finding out and in the long run suffocate.
In the event that your nearby squirrels choose you’ve put out a delectable nibble for their advantage, sprinkle all the cut surfaces with cayenne pepper powder or wipe with a glue of cayenne powder, a little water, and a drop or two of fluid cleanser (take care not to get cayenne in your eyes)
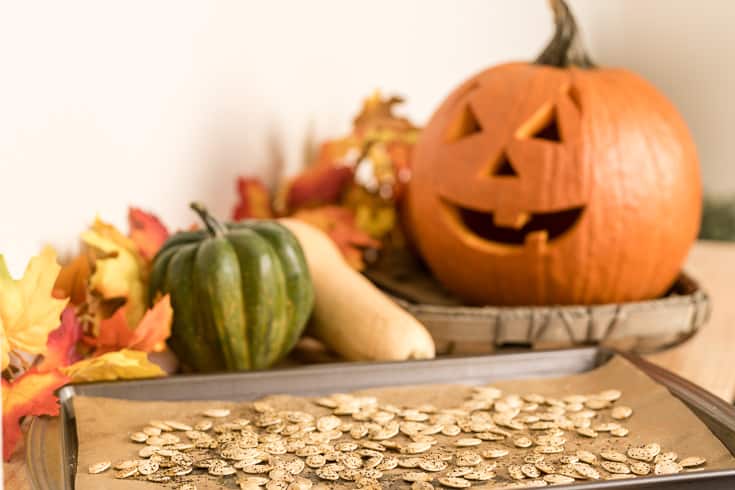
Instructions to Roast Pumpkin Seeds
Since you’ve figured out how to cut a pumpkin and you have your jack-o’- lamp, you might be thinking about how to manage the seeds. Pumpkin seeds are stacked with protein, minerals and great taste, so make eating them part of your pumpkin-cutting convention. First perfect the seeds you gathered by evacuating all the huge bits of mash with your fingers. At that point fill the bowl with water. Squeeze off and expel any filaments that stay to leave just seeds. Whirl the seeds around and pour off the overcast water. Top off and rehash until the water stays clear. Channel in a colander. Saute the seeds in coconut oil with your preferred seasonings. Or on the other hand spread the dry seeds in a solitary layer and heat them in a 300 F stove for 15–20 minutes, checking as often as possible close to the end. You need them to be dry and crunchy, however not all that darker they taste consumed. You can eat them plain. Or on the other hand hurl them with coconut oil and sweet or exquisite seasonings. At that point return them to the broiler for a couple of more minutes.
NOTE: Unlike the pepitas you purchase at the store (which originate from extraordinary “stripped seeded” pumpkin cultivars, for example, ‘Kakai’ or ‘Woman Godiva’), most pumpkin seeds have a slight, papery shell around the green, substantial seed inside. It’s fine to eat the shells, or you can let out the extreme bits as you would sunflower seed shells.
Related: 40 Pumpkin Recipes (Not Your Traditional Pumpkin Pie)
The most effective method to Carve a Pumpkin Step by Step
Complete Time: About 60 minutes
Fixings:
Pumpkin
Cutting apparatuses: blades, little saws and bits
Felt tip marker
Tea light candles (customary or battery-worked)
Headings:
Spot your pumpkin on a strong surface you can wash (or spread paper to get any trickles).
Draw the proposed cut on the skin with a felt tip marker. I prescribe drawing the opening on the base of the pumpkin.
Make a straight-sided opening into the focal point of the base of the pumpkin.
Scoop out the stringy mash and seeds with your hands or a since quite a while ago took care of spoon, putting the seeds in a single bowl (for cooking later) and the mash in another for the chickens or the manure heap.
Draw your structure. Straightforward shapes, for example, triangles might be simpler to work with on the off chance that you are new to cutting a pumpkin.
Cut out your structure.
When you have got done with cutting, splash or wipe within the cavity, and all the cut surfaces, with a fundamental oil-based cleaning shower. Or then again douse the completed pumpkin medium-term in a tub of borax water.
Presently it’s an ideal opportunity to enlighten your jack-o’- lamp. Tea light candles are a decent size and simple to keep upstanding.


Comments