
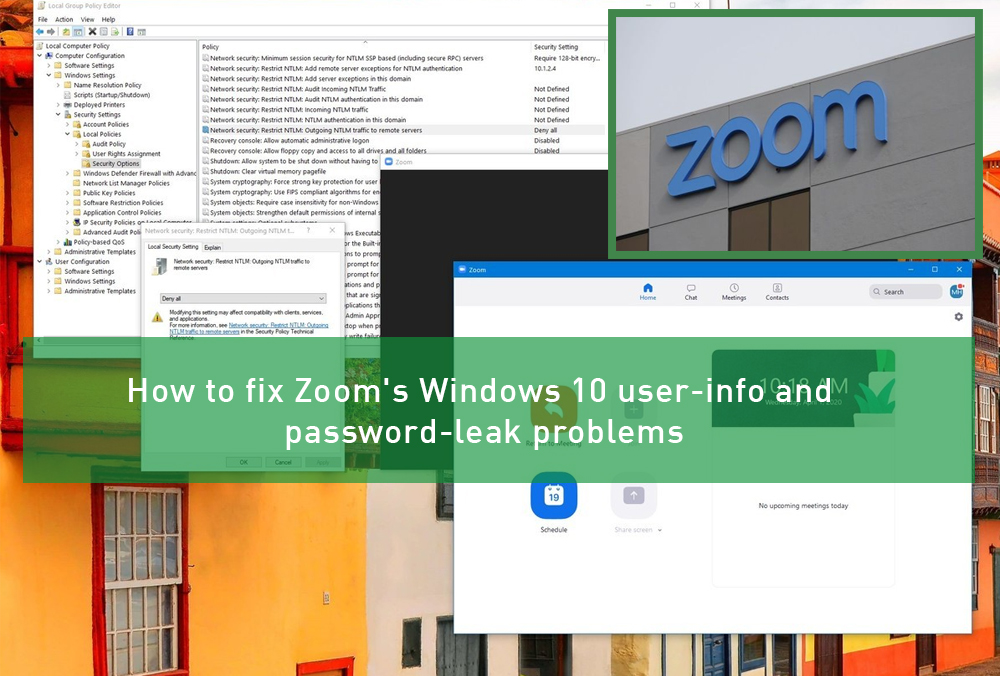
How to fix Zoom’s Windows 10 user-info and password-leak problems
MAURO HUCULAK
 Source: Windows Central
As the health crisis continues all over the world, many people turn to Zoom to work with home and communicate with colleagues using voice and video to stay connected with family and friends. However, a new vulnerability has recently been discovered in the desktop app by security researcher Matthew Hickey (@HackerFantastic) and Twitter user Mitch (@ g0dmode), which could allow hackers to retrieve people’s Windows login names and passwords.
According to a study published by BleepingComputer, the problem is due to how the Zoom client handles the Uniform Resource Locator (URL). When you use the Zoom chat feature, the URL you send is converted into a hyperlink (for example, https://windowscentral.com) suitable for opening websites using the default web browser.
The best online learning tools for kids: ABCmouse, Reading IQ and more
The only warning is that if you send the Universal Naming Convention (UNC) path (for example, \\ 192.1.1.112 \ file sharing folder), Zoom’s path also turns it into an actionable link. If anyone clicks the link, Windows 10 (or another version) tries to connect to a remote host using the Server Message Block (SMB) network file sharing protocol. In this case, the system also sends your login name and the NT Lan Manager (NTLM) credential hash.
Although it is not sent as mixed clear text containing your username and password, information can be obtained quickly in seconds using many tools available online for free. In addition to someone stealing your credentials, malicious individuals can use this vulnerability to launch applications on the local device when connected.
- In this Windows 10 guide, we will take steps to temporarily fix the vulnerability that could allow attackers to obtain your device login credentials until there is a permanent fix.
- How to fix a zoom login credential leak using Group Policy
How to fix a credential leak using Registry - How to fix a zoom login credential leak using Group Policy
- If you’re running Windows 10 Pro (or Enterprise), the easiest way to prevent a credential leak vulnerability when using Zoom is to use the Local Group Policy Editor.
Use these steps to prevent your credentials from being sent to a remote server with Zoom:
- Important: This is a workaround, if you configure this policy on a domain-joined computer or device connected to a file sharing server such as Network Attached Storage (NAS), the remote computer.
- Open Start.
Search for the gpedit.msc file and click OK to open the Local Group Policy Editor. - Check out the following path:
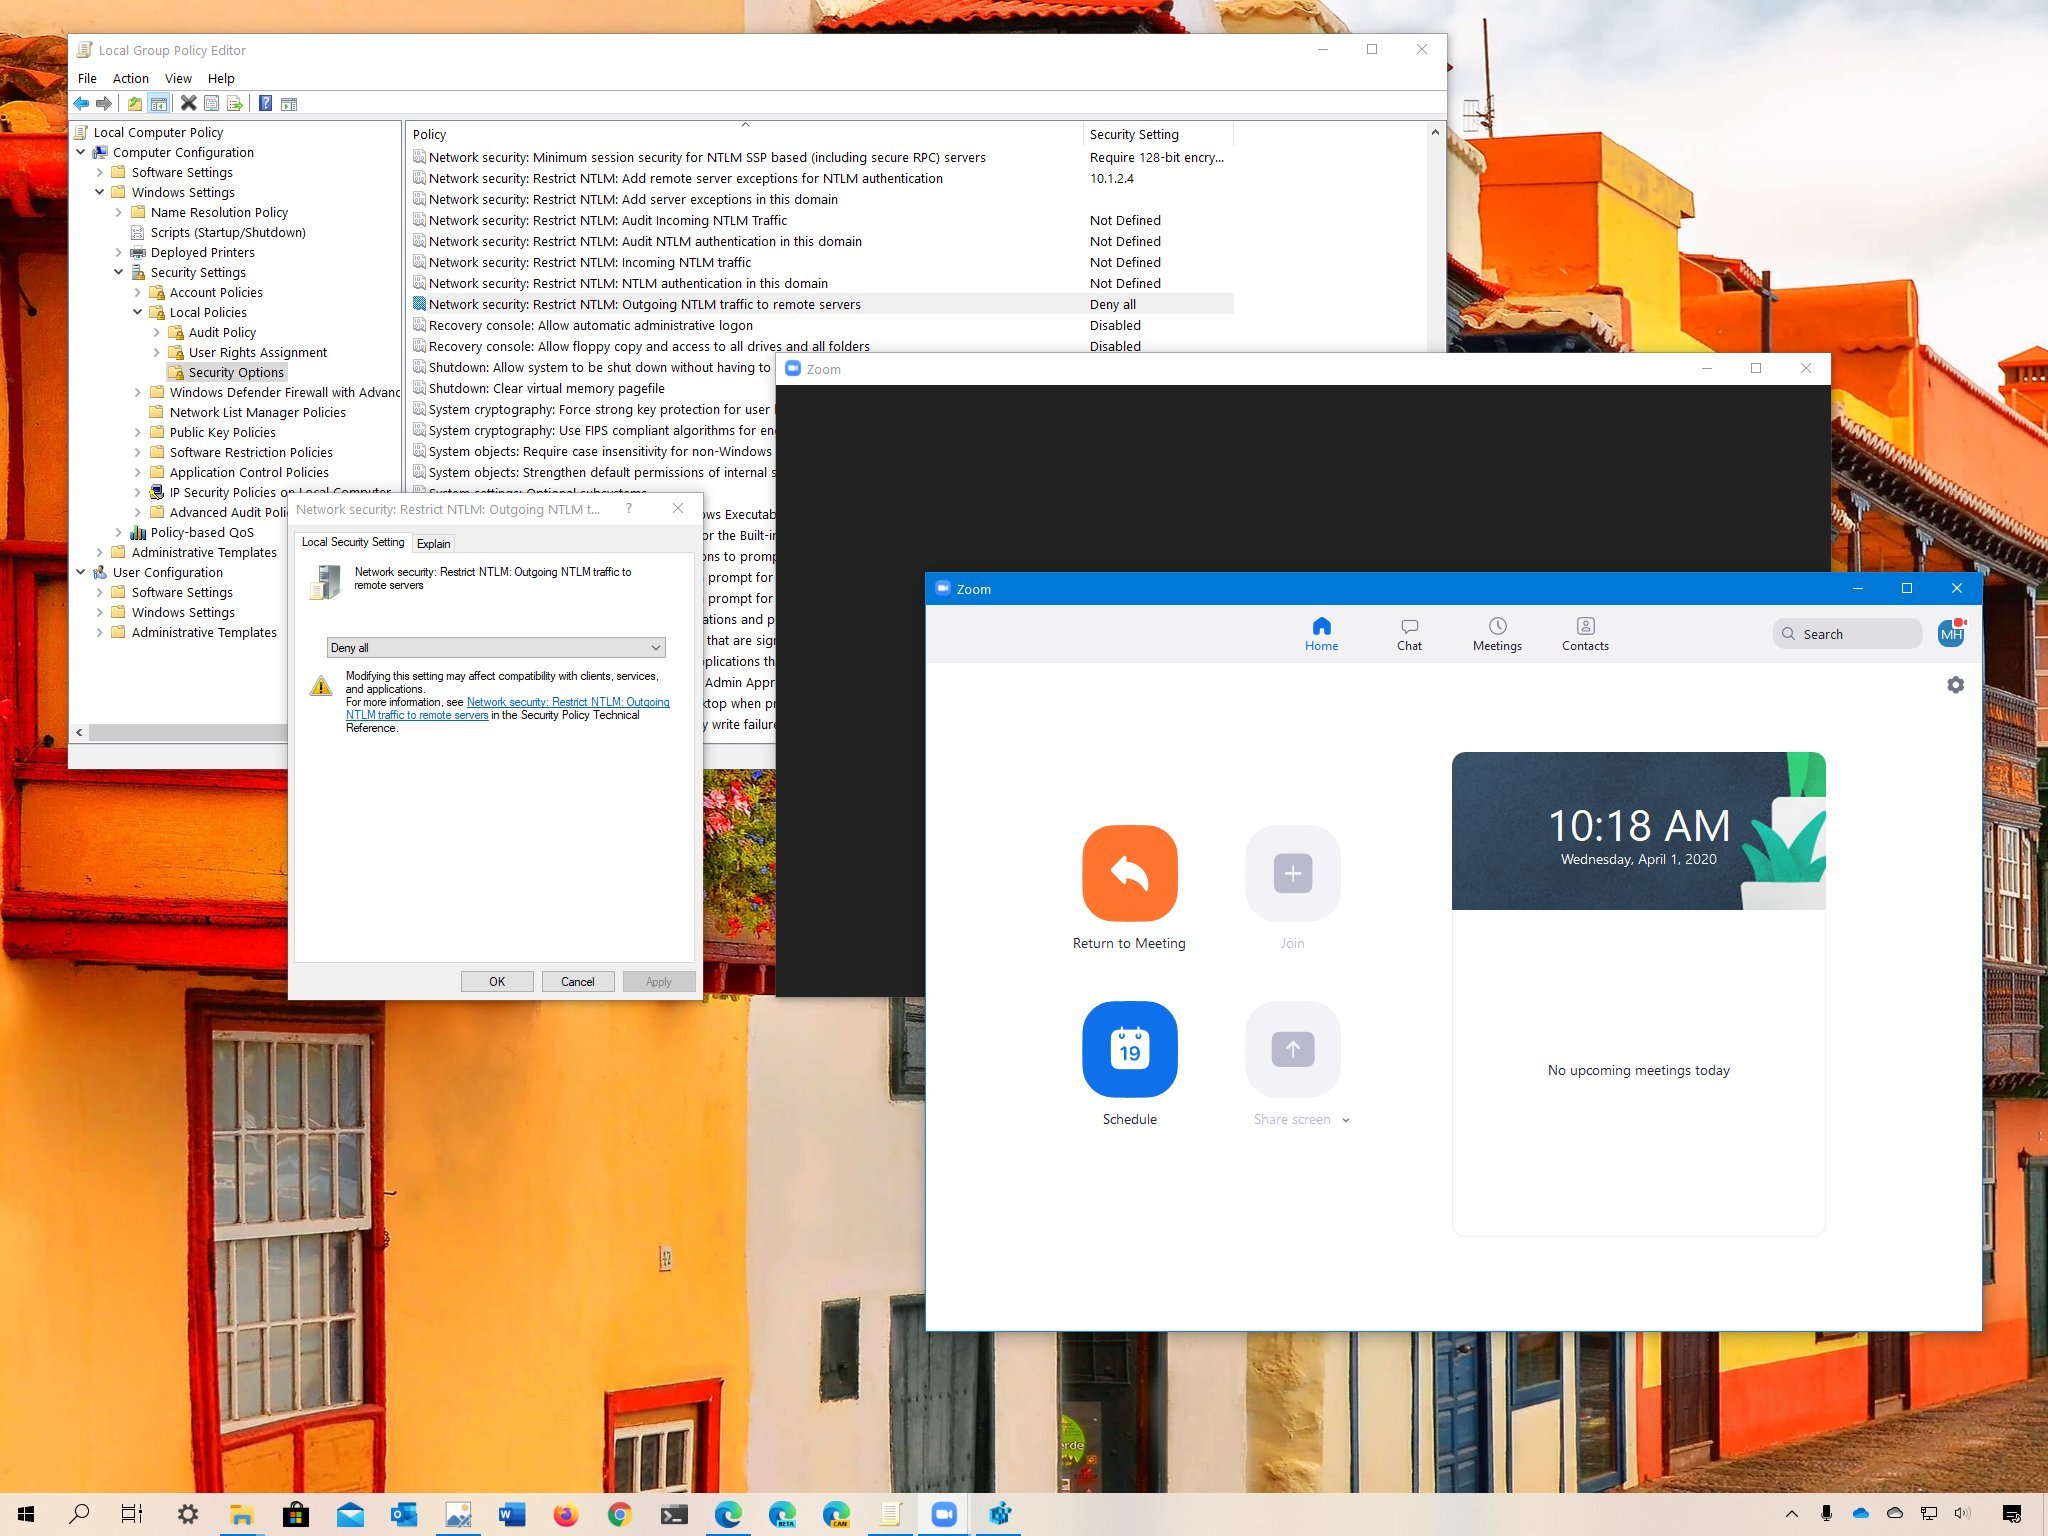
- Computer Configuration> Windows Settings> Security Settings> Local Policies> Security Options
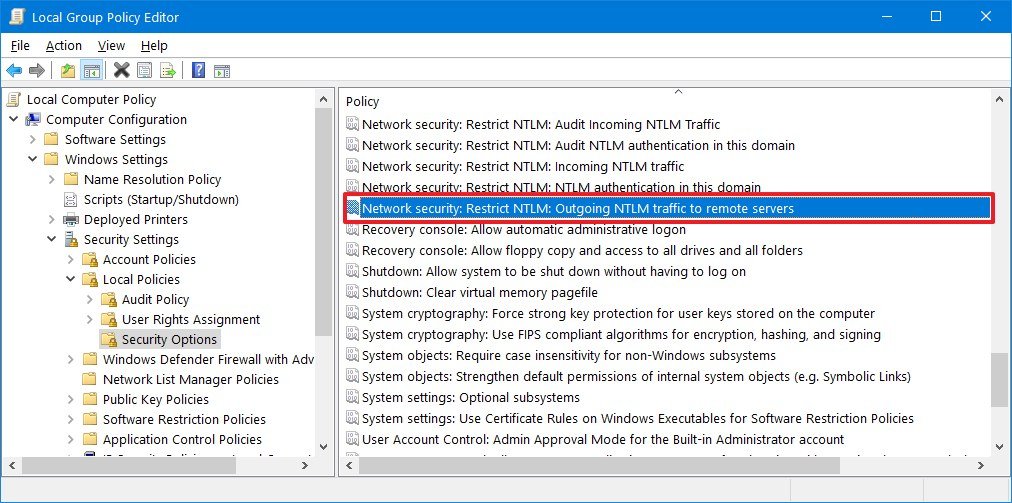
- On the right side, Network security: Restrict NTLM: Double-click the outgoing NTLM traffic to remote servers policy.
-
 Source: Windows Central
 - Select the Deny All option.
 Source: Windows Central
 - Click the Apply button.
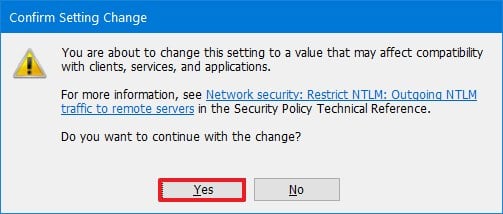
- Click the OK button.
- Click the Yes button to confirm.
 Source: Windows Central


After completing the steps, when using the Zoom client application on Windows 10, login NTLM credentials are not sent to a remote host while accessing a share.
- If you change your mind, you can undo previous settings using the same instructions, but in step 5, select Allow all.
- Configuring an exception (optional)
- If you are configuring this policy on a device that needs to be connected to a remote server, you can create an exception to access the files or service by the following steps:
- #zoom background,#zoom bombing,#zoom backgrounds,#zoom background images free,#zoom stock price,#zoom privacy issues,#zoombombing,#zoom app for computer,#zoom security issues,#zoom hacked,#zoom privacy,#zoom hackers,#zoom news,#fbi zoom, #zoom security,#zoom hacking,#is zoom safe,#zoom outlook plugin,#zoom security issues 2020,#is zoom secure,#zoom end to end encryption,#bleeping computer,#zoom vulnerability,#zoom security risk,#zoom security breach,#2020 zoom
Open Start.
- Search for the gpedit.msc file and click OK to open the Local Group Policy Editor.
- Check out the following path:
- Computer Configuration> Windows Settings> Security Settings> Local Policies> Security Options
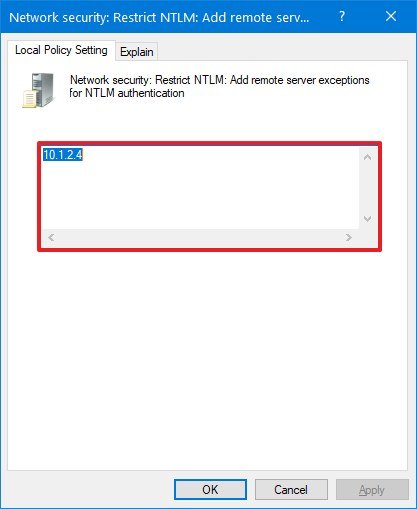
- On the right side, Network security: Restrict NTLM: Add remote server exceptions for NTLM authentication policy.
-
 Source: Windows Central
 - Specify the TCP/IP address of the remote server you’ll be trying to access resources.
 Source: Windows Central
 - Click the Apply button.
- Click the OK button.


After completing the steps, Zoom should no longer send your Windows login credentials to a remote host and you should still be able to access the files on the remote server.
When you no longer need this configuration, you can undo the changes with the same instructions, but make sure to clear the exception list in step 5.
How to fix a credential leak using Registry
- If you’re running Windows 10 Home, you won’t have access to the Local Group Policy Editor, but you can prevent Registry from sending your credentials to a remote host by changing the Registry.
- Warning: This reminds you that editing the Registry is risky and can cause irreversible damage to your setup if you do not do it correctly. It is recommended that you make a full backup of your PC before proceeding. Also, this is a temporary solution. If you configure this policy on a computer connected to a file sharing server such as Network Attached Storage (NAS), you most likely will not be able to access the files on the remote server.
- Use these steps to prevent your device login information from leaking while using zoom:
Open Start.
- Search regedit to open the registry and click the top result.
- Check out the following path:
- HKEY_LOCAL_MACHINE \ SYSTEM \ CurrentControlSet \ Control \ lsa \ msv1_0
- Quick tip: In Windows 10, you can now copy and paste the path in the Registry address bar to quickly jump to the key destination.
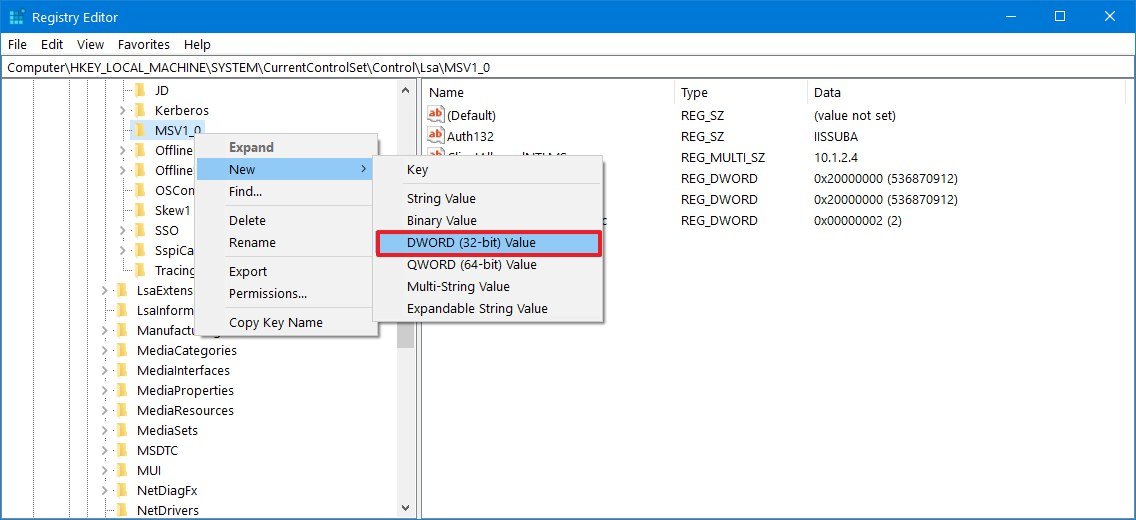
- Right-click the MSV1_0 key, select New, and click DWORD (32-bit) Value.
-
 Source: Windows Central
 - Name the key RestrictSendingNTLMTraffic and press Enter.
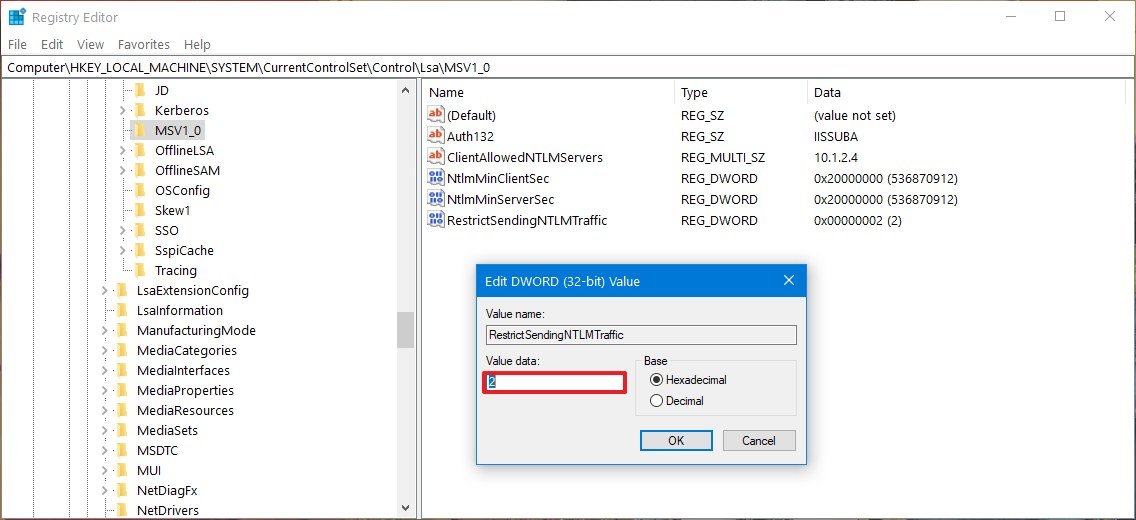
- Double-click the newly created DWORD and set the value from 0 to 2.
 Source: Windows Central
 - Click the OK button.

After completing the steps, the Zoom client should no longer send your NTLM credentials over the network to a remote host that someone can use to steal your device login information.
You can always undo the changes using the same instructions, but make sure to right-click the RestrictSendingNTLMTraffic key in step 5 and select the Delete option.
#zoom background,#zoom bombing,#zoom backgrounds,#zoom background images free,#zoom stock price,#zoom privacy issues,#zoombombing,#zoom app for computer,#zoom security issues,#zoom hacked,#zoom privacy,#zoom hackers,#zoom news,#fbi zoom, #zoom security,#zoom hacking,#is zoom safe,#zoom outlook plugin,#zoom security issues 2020,#is zoom secure,#zoom end to end encryption,#bleeping computer,#zoom vulnerability,#zoom security risk,#zoom security breach,#2020 zoom
Configuring an exception (optional)
If you are configuring this policy on a device that needs to be connected to a remote server, you can create an exception to access the files or service by the following steps:
Open Start.
- Search regedit to open the registry and click the top result.
- Check out the following path:
- HKEY_LOCAL_MACHINE \ SYSTEM \ CurrentControlSet \ Control \ lsa \ msv1_0
- Quick tip: In Windows 10, you can now copy and paste the path in the Registry address bar to quickly jump to the key destination.
- Right-click the MSV1_0 key, select New, and click DWORD (32-bit) Value.
-
Source: Windows Central
- Name the ClientAllowedNTLMServers key and press Enter.
- Double-click the newly created DWORD and specify the TCP / IP address of the remote server where you will be trying to access the resources.
-
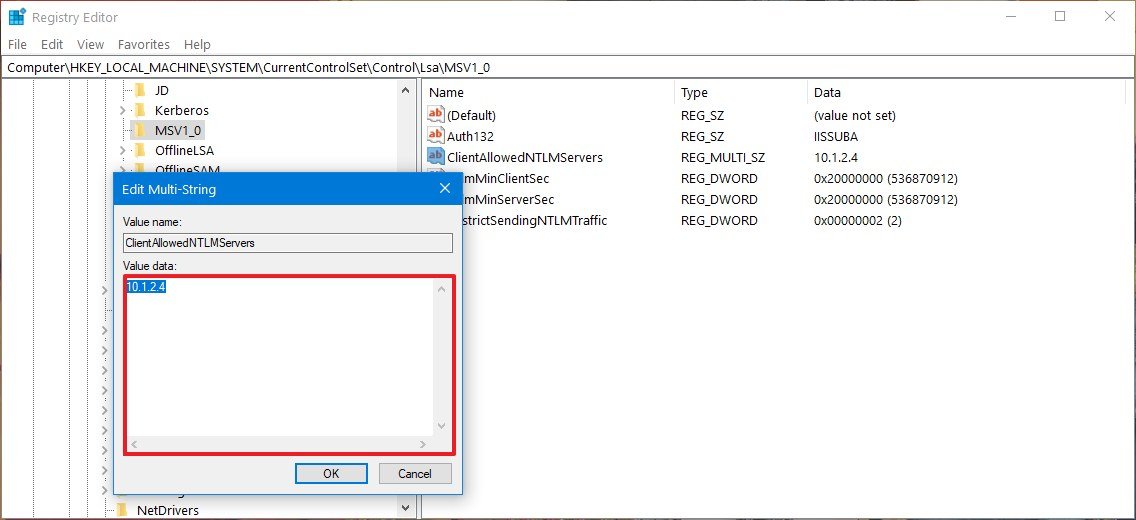 Source: Windows Central
 - Click the OK button.

After completing the steps, you should be able to continue accessing files on the remote server by stopping the Zoom desktop client potentially sending your NTLM credentials over the network.
When you no longer need the configuration, you can undo the changes using the same instructions, but make sure to right-click the ClientAllowedNTLMServers key in step 5 and select Delete.
Other Windows 10 resources
For more useful articles, coverage, and answers to frequently asked questions about Windows 10, visit the following resources:


Comments